
arduino_레이져모듈 개발.

정보가 가장 많은 사이트
https://www.tindie.com/products/greathings/laser-rangefinder-module-v2-20hz80m/
http://debiaonoldcomputers.blogspot.com/2016/08/phase-laser-ranging-module-cy30-mb.html
요 사이트에서의 핵심내용은
$00022123& = 단일 측정 시작 = ok
$0003260130& =OPEN =
$00022426& = 연속 측정 열기
$0003260029& = 연속 측정 중지
$00023335& = 지시 확인
$0001643& = 마지막 7 비트 = 신호없음.
$0001542& = 거리가 너무 가까움
$00022123& = 폐쇄 형 연속 측정 = 확인 + 명령 반복
$00022123& = 레이저 끄기
단일 측정
센서 반환을 단일 측정 모드에서 코드 $ 00023335 의
$00023335&$0006210000008916& 0.08916 M
이 경우 008916은 0 데카 미터, 0 미터, 8 데시 미터, 9 센티미터, 1 밀리미터를 나타냅니다.
파란색 데이터는 실행 확인 응답 코드를 나타냅니다.
녹색 데이터는 정수 부분을 나타내는 처음 두 위치와 거리를 나타냅니다. 마지막 5는 소수점 부분 (미터 단위 측정)을 나타냅니다.
그렇지 않으면 이러한 오류 코드가 생성됩니다.
라고 함…
1. 통신규격 연결은 115200 8n1이라고 한다. (url)
Il modulo che ho preso ha una portata di 40 m ed i dati di errori dichiarati indicano una standard deviation di 2 mm a 10 m e 3.5 mm a 40 m (secondo la regola ± 2 + 0.05 * (D-10) dove D e’ la distanza. La dimesione del punto di misura e’ di 6 mm di diametro a 10 m
La connessione quindi e’ una standard seriale a 115200 8N1.
Per effettuare le misure si inviano dei codici al sensore
| Instruction List | |||
| instruction content | Content | Answer | Memo |
| Start single measurement | $00022123& | ok(Confirm) | Measurement data after confirm |
| Lights | $0003260130& | Confirm + repeat command | |
| Open the continuous measurement | $00022426& | ok(Confirm) | |
| Stop continuous measurement | $0003260029& | Confirm + repeat command | |
| Instruction confirmation | $00023335& | This is the confirmation instruction from the submachine | |
| Last 7 bits | 0001643 | No signal | |
| Last 7 bits | 0001542 | The distance is too close | |
| Closed continuous measurement | $00022123& | Confirm + repeat command | |
| Turn off the laser | $00022123& | ok(Confirm) | The module does not have a sleep mode,if need to close the laser, use a single instruction |
nella documentazione viene usato in termine improprio la parola bits. Sarebbe meglio sostituire con “posizione”
Misura singola
In modalita’ singola misura il sensore rimanda indietro il codice $00023335& seguito da altre informazioni
$00023335&$0006210000008916& 0.08916 M
in questo caso 008916 indicano 0 decametri, 0 metri, 8 decimetri, 9 centimetri, 1 milllimetro
i dati in blu indicano il codice di risposta di conferma di esecuzione
i dati in verde indicano la distanza con le prime due posizioni che indicano la parte intera e le ultime 5 indicano la parte decimale (misure in metri)
altrimenti vengono generati questi codici di errore
| Error code | Reason | Error Response Time |
| $00023335&$0006210000001542& | Distance too short | About 5 seconds from sending instructions to returning an error code |
| $00023335&$0006210000001643& | No echo | About 5 seconds from sending instructions to returning an error code |
| $00023335&$0006210000001744& | reflection is too strong | About 5 seconds from sending instructions to returning an error code |
| $00023335&$0006210000001845& | ambient light is too strong | About 5 seconds from sending instructions to returning an error code |
Modo continuo
In questa modalita’ ogni 5 misure il laser viene spento e riacceso. Vengono effettuate sessioni da 500 misure
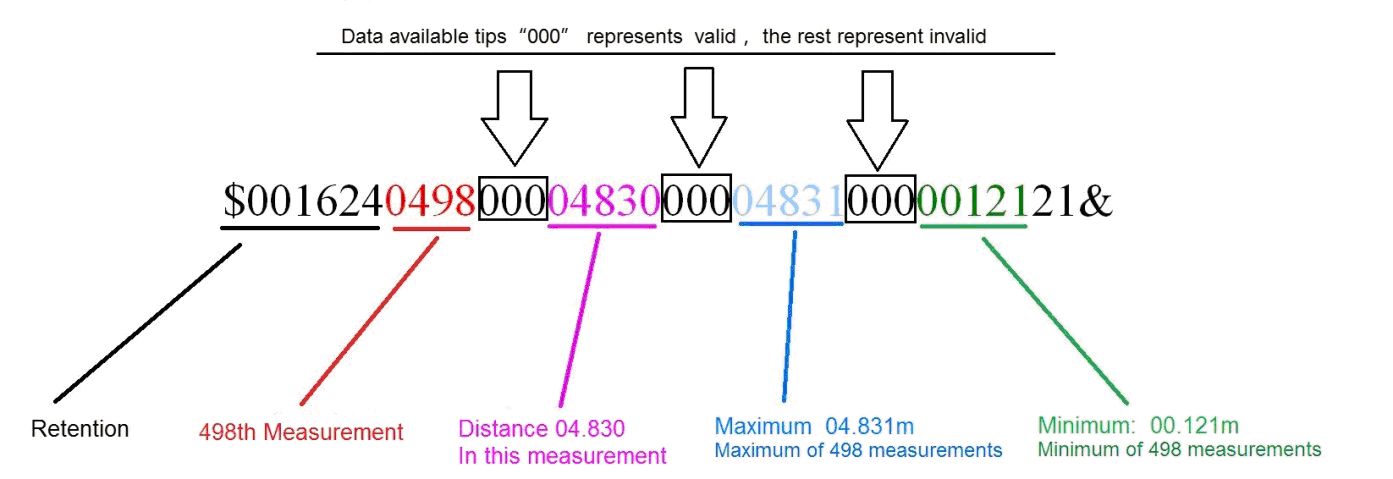
Per attivare il modo continuo si invia $00022426& e riceve risposte che iniziano con $001624.
Nella risposta si ha il numero progressivo di misura, il valore massimo e minimo ed istantaneo della distanza del bersaglio. I separatori 000 indicano misura corretta, altrimenti errore
i codici di errore per il modo continuo sono
| Error code | Reason | Error Response Time | Illustrate |
| $001624999900000015000000000000000053& | Distance too short | About 5 seconds from sending instructions to returning an error code | If an error occurs in the continuous measurement, the measurement will be stopped, the number counter (data 7th to 10th Bit) automatically set to 9999, start a new easurement will start at 1 |
| $001624999900000016000000000000000054& | No echo | About 5 seconds from sending instructions to returning an error code | |
| $001624000100118297001182970011829711& | Ranging error | About 5 seconds from sending instructions to returning an error code | Distance data invalid |
Per l’uso in esterno si devono usare riflettori
2. 검색하여 찾은 관련자료.
# 다운로드
1.전용sw
2.깃허프파일
3. 잘 작동되는걸로 생각되는 코드!!!
4. 다소 부실해보이는 제조사 사이트 (url)
매개변수: 전력 공급
전압: dc3v ~ 3.3 v
현재: 100mA
측정 범위: 0.01-80 m
측정 FRequency: 5 hz, 10 hz, 20 hz (조정가능한)
움직이는 물체의 측정 가능한 속도: 2 메터/초 미만
측정 정확도 (표준 편차): ± 1.mm
거리 단위: m
레이저 유형: 620-690nm
레이저 종류: 종류 ii,
Baud 비율: 9600bps;
데이터 비트: 8 비트;
시작 비트: 1bit;
정지 비트: 1bit;
패리티: 없음.
비고: 환경 강도가 너무 크기 때문에 주변 온도가 너무 높거나 너무 낮기 때문에 반사경이 너무 약하거나 너무 강하거나 거친 표면의 목표입니다. 다른 측정 목표 및 측정 환경은 측정 범위 또는 측정 결과의 일부 오류를 일으킬 수 있습니다.
• ADDR 장치 주소
• 위치 1, 상단에서 카운트, 항목 0, 끝에서 카운트 (fa 04 08 01 f9),기본 설정은 끝에서
• Cs 체크 바이트, 그것은 전면에 있는 모든 바이트를 요약합니다,역 반환으로, 플러스 1, 하나의 측정 및 연속 측정에 의해 반환, 따옴표는 데이터의 일부입니다,형식은 ASCII 샘플:123.456 m디스플레이31 32 33 2E 34 35 36ADDR 기본값 80 (128)
매개 변수가 공장 설정되면 데이터를 읽는 명령:단일 측정:80 06 02 78 연속 측정:80 06 03 77
셧다운 장치:
80 04 02 7A
세트 주소:
FA 04 01 80 81
거리 수정:
FA 04 06 2D 01 CE -1
FA 04 06 2B 01 D0 + 1
시간 간격 (1 s):
FA 04 05 01 FC
세트 시작 포인트:
FA 04 08 01 F9 탑
FA 04 08 00 FA 다시 끝
설정 범위:
FA 04 09 05 F4 5 m
FA 04 09 0A EF 10 m
FA 04 09 1E DB 30 m
FA 04 09 32 C7 50 m
FA 04 09 50 A9 80 m
세트 주파수:
FA 04 0A 00 F8
FA 04 0A 05 F3 5
FA 04 0A 0A EE 10
FA 04 0A 14 E4 20
세트 해상도:
FA 04 0C 01 F5 1mm
FA 04 0C 02 F4 0.1mm
전원을 켜질 때 측정을 시작하십시오:
FA 04 0D 00 F5 끄기
FA 04 0D 01 F4 켜기
단일 측정 (방송)
FA 06 06 FA
읽기 캐시:
80 06 07 73
제어 레이저:
80 06 05 01 74 오픈
80 06 05 00 75 닫기
고시:
당신이 고등 주파수, 당신은 희생 정확도 측정. 때 세트
20 hz (fa 04 0a 14 e4 보내기), 연속 측정 모드의 정확도는 +-4mm 될 것입니다.
주파수는 최저 주파수 (fa 보내기) 04 0a 00 f8), 연속 정확도 설정
측정 모드는 1mm 안에 일 것입니다.
단일 측정 모드 (80 06 02 78 보내기) 에서 정확도는 항상 1mm 이내.
google 키워드
: Jedrek Laser Ranging Module
: cy30-mb Laser Ranging Module
중국에서 성공한 코드
https://blog.csdn.net/wuyanmin1995/article/details/70340228
레이저 거리측정기 원리 설명. 및 세부 부품 알려줌;;;중국무섭네https://blog.csdn.net/wangjie36/article/details/104809824?utm_medium=distribute.pc_relevant_download.none-task-blog-searchFromBaidu-4.nonecase&depth_1-utm_source=distribute.pc_relevant_download.none-task-blog-searchFromBaidu-4.nonecas
아래 것이 힌트라면 힌트일지도..
- uchar xdata laserOn [12] = { “$ 0003260130 &”};
- uchar xdata singleTest [10] = { “$ 00022123 &”};
- uchar xdata multipleTest [10] = { “$ 00022426 &”};
- void Timer0Init (void) // 50 밀리 초 @ 6.000MHz
- http://www.51hei.com/bbs/dpj-48353-1.html
http://debiaonoldcomputers.blogspot.com/2016/08/phase-laser-ranging-module-cy30-mb.html